Stopwatch Project

I’m still looking for a new project to work on. Previously, I had mentioned that I built a Podcast Downloader. That project will (still) likely never see the light of day.

I’ve also been working on something else. This is a replica of Apple’s Stopwatch functionality in the Clock app. This project has been open-sourced on my Github account. You can view the project here.

It’s not a complete replica of the stopwatch functionality. I only implemented the digital version and not the analog version. I’m not sure I have the patience to attempt to implement the analog version. I also didn’t implement the iPad or macOS versions of the stopwatch. I only focused on the iPhone version.

Why?

Why did I do this? I did this so I can continue to improve as a software engineer.

I don’t get as much time to write code anymore. At least not as much as I want to. Even at my day job, I spend more time not writing code. I like to believe that projects like this keep me from getting rusty.

As I’ve said, I don’t currently have a personal project to work on. So something like this helps me to continue to learn new technologies and stay current.

Development Process

This project was developed over roughly two weeks. I only worked on it for roughly an hour a night and not every night.

The project has been sitting untouched for a few weeks on my laptop. I wasn’t sure if I was going to post it at all. I finally decided to post it.

The project wasn’t code reviewed or tested too rigorously for issues. It probably isn’t my best work. It also isn’t my worst work. Overall, I’m happy with how it turned out.

Technologies

The project is written in Swift, SwiftUI, and Combine and uses an MVVM-like architecture. I am still learning each of these technologies and approaches.

Swift

I’ve been using Swift since it was announced at WWDC in 2014. I haven’t written much in Objective-C in a few years. Swift is the way to go.

Even though I have been using Swift for years, I still have a lot to learn. I didn’t learn anything new with Swift in this project. Instead, I focused on learning more about the next two technologies.

SwiftUI

I’m still new to SwiftUI. I’ve used it here and there in the past. However, I’ve never built an entire app using SwiftUI. This is a first for me.

This app is simple, but I’ve learned valuable lessons from what I have done.

At work, we’ve been slowly writing new features using SwiftUI. I think the code I wrote here will help at work.

Combine

I’ve been interested in Combine since it was announced. At the time, I had started using Combine for simple things, like dealing with notifications from NotificationCenter.

We use Combine (and RxSwift) heavily at work. It took me a while to start learning the concepts. I still need to occasionally look at guides on Combine. Any extra experience I can get with Combine (and reactive programming) is welcome to me.

I’ve come a long way with my Combine knowledge in the last few years. But I have so much more to learn.

Testing

I have always been an advocate for unit testing. The problem is that unit testing is always the last on my mind when developing. I love the idea of having unit tests, I’m just not very dedicated to writing them.

I’m trying to do a better job of that, including this project. I probably don’t need any unit tests for something like this. The entire project is an experiment. But I need to start somewhere. So, I included unit testing.

I could improve the unit testing in many ways. I could probably use something like ViewInspector to test the SwiftUI views.

I should also provide a deterministic way to test the display strings that are generated by the StopwatchViewModel class while the timer is running. Instead of hard-coding the .main RunLoop in this method:

private func startTimer() {
    timerCancellable = Timer
        .publish(every: 0.01, on: .main, in: .common)
        .autoconnect()
        .sink { [self] newDate in
            let difference = (date ?? .now).distance(to: newDate)
                
            date = newDate
            overallInterval += difference
            currentLapInterval += difference
        }
}
A Swift function that starts a timer

I could start the timer, stop it, and ensure the value is not the default display string value of “00:00.00”, but that’s not a great test. Ideally, I would advance the timer at different intervals and test the results.  

I wonder if Point-Free’s Combine Schedulers Publishers.Timer would work here. This approach would allow using any scheduler (including their TestScheduler) instead of  RunLoop.  This would allow me to advance the schedule as I desired and make the tests more deterministic.

I didn’t use this approach only because I didn’t want to depend on external libraries for this project. It was initially a thought experiment. If I would ever want to make this a full-scale app, I would investigate using Publishers.Timer.

Coverage

Stopwatch App Code Coverage Results - Showing 78.2% Coverage

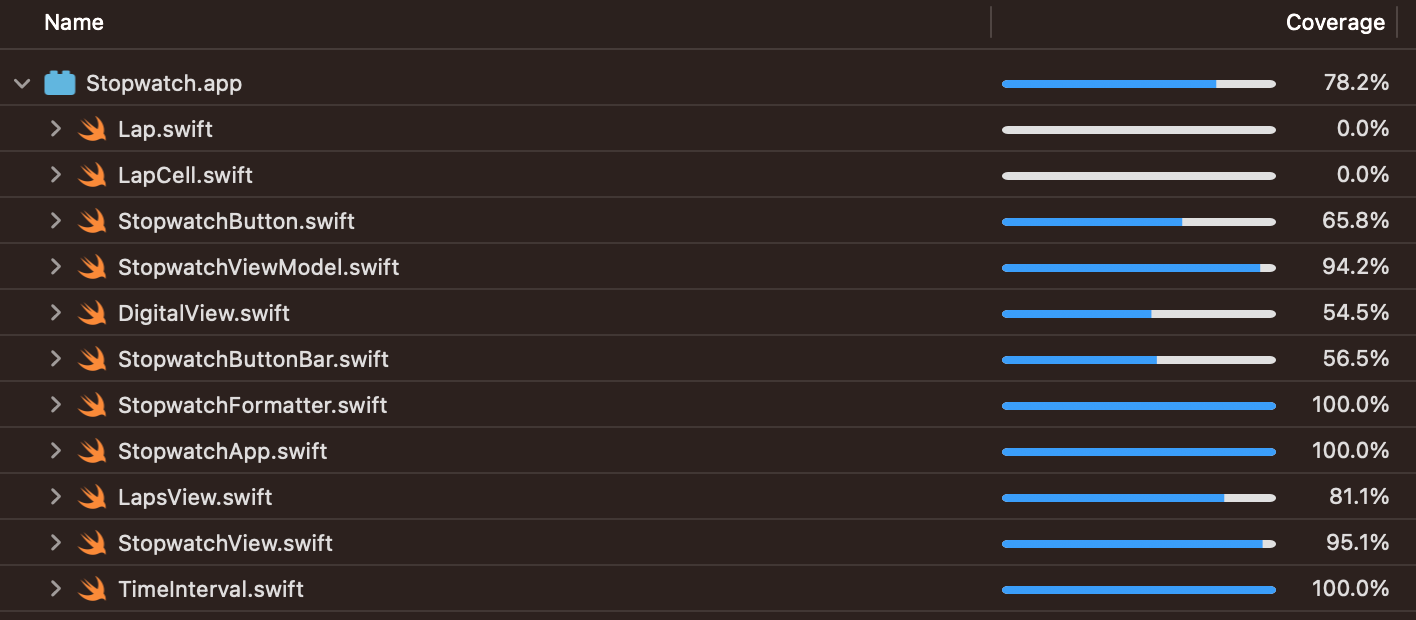
The coverage on the app is decent. It’s at about 78%. It could be better. I think if I were using a testing framework like ViewInspector, I could test the SwiftUI views and get better coverage.

Summary

I’m happy with how this turned out. I didn’t spend a crazy amount of time on it. I don’t have a lot of time each night to write code. Often, I don’t get any time at night to write code.

This was a fun little experiment.

UIKeyCommand — Part 3: macOS Catalyst Menu Items

This is the final post in a series on adding UIKeyCommands (keyboard shortcuts) to an iOS app. In this post, we’ll cover how to add menu bar items to a macOS Catalyst app using UIKeyCommands.

This will not be a full tutorial on how to add menu items to macOS Catalyst apps. Instead, this post will demonstrate that you can use the same keyboard shortcuts created in part two and create menu items.

In macOS Catalyst apps, your UIApplicationDelegate class (usually AppDelegate) will configure the menu bar. This is handled in the func buildMenu(with builder: UIMenuBuilder) method (documentation). In this method, you can add and remove menu items and sub menu items.

You can download the corresponding sample app here (the branch is part-3-catalyst). I slightly refactored the code that creates the UIKeyCommand to be a class level variable on the two view controllers. They can now be easily accessed like: TableViewController.showTableAlert.

Use the existing UIKeyCommand objects in a UIMenu initializer and then added to the builder object in the buildMenu method (from above) like this:

    let menu = UIMenu(title: "Show",
                      identifier: .show,
                      options: .displayInline,
                      children: [TableViewController.showTableAlert,
                                 DetailViewController.showDetailAlert])
                                 
    builder.insertChild(menu, atStartOfMenu: .file)
    
Swift code snippet to create a menu item

This little block of code adds the “Show Table” and “Show Detail” menu items. When you run the app, it will look like this.

Resulting menu

That’s it. That’s really all there is to it to take existing keyboard shortcuts and add them to a macOS Catalyst app as menu items.

UIKeyCommand object are incredibly versatile in the situations we’ve gone over in this series. They can be added to both simple and more complex apps. They can also be used in macOS Catalyst apps to provide menu bar items.

Part 1Part 2

UIKeyCommand — Part 2: Split View Controller

In the first post in this UIKeyCommands series, we went over the basics of UIKeyCommands and adding keyboard shortcuts to an app. Adding keyboard shortcuts to a real app can be a little more complicated, but not much.

First, some background

My latest update of Beer Style Guidelines has these keyboard shortcuts reenabled. A long time ago, I had keyboard shortcuts enabled within the app. At that time, I didn’t have a clear understanding of how they worked. This lack of understanding meant that the keyboard shortcuts didn’t quite work the way I expected them to (or at all sometimes).

I became frustrated with my lack of understanding and I just disabled the keyboard shortcuts. I didn’t have a lot of time to investigate and figure out what was wrong. But I was determined to figure it out. Recently, I had purchased an iPad Air (4th Generation) and an Apple Magic Keyboard. This gave me the kick in the butt to get the keyboard shortcuts working again.

Getting the keyboard shortcuts working wasn’t a lot of work. I just lacked an understanding of how to put it all together. I hope to impart some of that wisdom in this post.

Beer Style Guidelines has a Split View Controller view architecture.

Split View Controller Wireframe

In my first iteration of keyboard shortcuts, I had two or three commands. They were all triggered from the Detail View Controller (the large part of the screen). I wanted to add more keyboard shortcuts, but I was paralyzed with not knowing how to proceed.

Ok. So, what was holding me up? I wasn’t sure which view controller in the app I needed to implement the keyboard command. Did I need to add them all to my Split View Controller class? Did I need to implement the commands in one view controller or the other, based on a user’s focus?

I started by adding the commands to the split view controller class. But it turns out that isn’t the correct answer. The correct answer is that you implement the keyboard commands wherever you need them, and let the Responder Chain take care of the rest.

Responder Chain? What?

In iOS, there is this thing called the responder chain. The responder chain is how iOS (and UIKit) determine how to handle events. This chain starts with the first responder and then traverses the rest of the chain looking to handle the event. In the case of UIKeyCommands, UIKit will traverse the responder chain and collect the UIKeyCommands for the current scenario.

This WWDC video (Support hardware keyboards in your app) does a fantastic job of explaining all of this. It’s also super short. I only discovered the video after I figured out how this works.

You may have noticed that the UIApplicationDelegate class (usually called AppDelegate) is a subclass of UIResponder. What you may not have noticed is that all UIViewControllers and even UIViews subclass UIResponder.

Back to UIKeyCommand

Getting back to where to implement the keyboard shortcuts. I ended up implementing the keyboard shortcuts for the list view (search, change guide, etc), in the list view controller. The keyboard shortcuts used in the detail view controller (like toggle favorite, next/previous section, etc) were implemented there.

Like in part one, I’ve created a sample app to put this into practice. This sample app uses a Split View Controller and implements keyboard shortcuts where it makes sense. The sample app only has a few keyboard shortcuts.

The list view controller has two keyboard shortcuts and so does the detail view controller.

You may notice something strange about these keyboard shortcuts. Both have the “Show Info” keyboard shortcut. I did this as a test more than anything. I wanted to see what would happen if there are duplicate keyboard shortcuts. Likewise, I also wanted to see where this was called from when triggered. I discovered that found that the keyboard shortcut in the detail view controller usually wins. I think that’s because it’s the first responder in the chain that responds to this command.

This may feel a bit overwhelming. But it’s not very difficult. The sample app should give you a better idea of how easy it is to implement keyboard shortcuts in a split view controller.

There’s one more post in this series. Next time, we’ll stray away from iOS slightly to use UIKeyCommands to add menu items to a macOS Catalyst app.

Part 1Part 3

UIKeyCommand — Part 1: The Basics

This post is the first in a series of three on UIKeyCommands on iOS. In this first post, we’ll go over UIKeyCommand at a high level.

What are UIKeyCommands?

UIKeyCommands represent a key press (or combination of key presses) on a hardware keyboard that will trigger an action. In short, you can think of these as keyboard shortcuts. The system already has a few built-in keyboard shortcuts. Some of these are keyboard shortcuts are Cut (⌘ + x), Copy (⌘ + c), and Paste (⌘ + v).

Beginning in iOS 7, Apple started allowing developers to implement keyboard shortcuts. The system already handles Cut, Copy and Paste and developers won’t need to implement these.

These keyboard shortcuts have been around for a few years. So, it’s easy to see how other developers have implemented these. A great way to discover what keyboard shortcuts apps have is to launch the app, and then hold down the command (⌘) key. Here’s an example from my app Beer Style Guidelines.

iPad Keyboard Shortcut Discovery

How do I implement my own UIKeyCommand?

There are two parts to implement UIKeyCommands in your app. First, is the UIKeyCommand object itself. Then these UIKeyCommands need to be integrated into the app.

The initializer for UIKeyCommand has a lot going on. You don’t need to use every parameter. Here are the minimum parameters to create a UIKeyCommand object. Those parameters are:

  • title: This is the display title of the keyboard shortcut.
  • action: This parameter points to the method that gets called from this shortcut.
  • input: This is the keyboard key (a string) that is part of the keyboard shortcut. For example, the “c” in the Copy shortcut (⌘ + c)
  • modifierFlags: This is the modifying key that is the other part of the keyboard shortcut. For example, the “⌘” in the Copy shortcut (⌘ + c)

Putting all of this together, you can create a keyboard shortcut like this:

    let infoCommand = UIKeyCommand(title: "Show Info",
                                   action: #selector(showInfo),
                                   input: "i",
                                   modifierFlags: .command)
Swift code snippet to create a keyboard shortcut

In this example, the user will trigger a keyboard shortcut to show info when they use ⌘ + i. This will show them an iOS alert with a simple message in it.

I’ve created a sample app that pulls all the various pieces together. The sample app, is simple. It has a single keyboard shortcut. You can discover this just like keyboard shortcuts in other iOS apps.

Download and run the sample app. Once launched, hold down on the Command key (⌘) until you see the prompt showing the single keyboard shortcut within the app.

Testing in the simulator.

If nothing shows up, and you’re testing this in the simulator, you may need to enable “Send Keyboard Input to Device” in the simulator. This can be done through the menu system by selecting I/O → Input → Send Keyboard Input to Device. Or, you can click on this button in the toolbar (below) of the simulator. Without doing this, sometimes the keyboard shortcuts can be lost, and it will seem like the keyboard shortcuts are not working.

Send Keyboard Input to Device

That’s it. Keyboard shortcuts are straightforward to set up and get working in your apps. Next time we’ll get a little more in-depth on UIKeyCommand.

Part 2Part 3

Swift Labeled Statements

I’ll be honest. I didn’t know that Labeled Statements were a thing (let alone in Swift) until a few days ago. I discovered them while reading Pro Swift by Paul Hudson for the Philly CocoaHeads Book Club.

Labeled statements allow developers to label control statements. Here’s what a for loop would look like with a label:

fancyLabel: for each in array {    
    ...
}
Labeled for each loop

An if statement with a label looks very similar.

anotherLabel: if known == test {    
    ...
}
Labeled if statement

Lastly, a switch statement looks like this:

switchLabel: switch(myEnum) {    
    ...
}
Labeled switch statement

As you can see the syntax for a label is label followed by a colon (:) and then the statement as normal.

Ok. So, what can I do with this?

These can be thought of as glorified goto statements. You can use continue or break statements to change the control flow to a labeled statement or break out of a labeled statement.

This can be handy for breaking out of nested loops. Typically, breaking from a nested loop will only break out of the nested loop. Control will remain in any outer loops. By adding a label to the outer loop, you can effectively goto or break from that outer loop.

Here are two examples.

A nested for loop using continue:

fancyLabel: for each in array {    
    for eachSubItem in subArray {        
        switch statement {        
        case one:            
            continue fancyLabel        
        ...        
        }    
    }    
    ...
}
Nested labeled for loops with continue

Here’s an example of break being called in a nested for loop:

 fancyLabel: for each in array {    
    for eachSubItem in subArray {        
        if statement {            
            break fancyLabel        
        }        
        ...    
    }    
    ...
}
Nested labeled for loops with break

If you have a complex method that contains nested for loops, a labeled statement will allow you to break from an outer loop and continue on with execution of the method.

Paul had some nice examples in the book. I’m not going to re-publish those here. Instead, I’ve come up with my own poor/contrived example here:

func findNeedle() -> Coordinates {
    var x: Int = 0, y:Int = 0

    searchHaystack: for row in haystack {
        for each in row {
            if each == needle {
                break searchHaystack
            }

            y += 1
        }
        
        x += 1
        y = 0
    }
    
    doStuffWithResults()

    return (x, y)
}
Example function with labeled statements

This example will loop through a associated array looking for a value. When it finds the ‘needle’, it will exit out of the nested for loops and continue on with the method.

This is a really simple example on how to use labeled statements. I’ve tried to think of a better example, but nothing really felt good. I feel like the examples I come up with could be written better without the labeled statement at all.

I don’t think these will be entirely useful in practice. In essence they are glorified goto statements and using them feels like a bad code smell to me. If you need to use them, you can probably refactor your code to avoid them. But it’s nice to know that they exist.

OlderNewer