Charles Proxy Primer

I’ve been an iOS developer (professionally) for over six years. There is one constant in every iOS app that I’ve written for someone else. They all communicate with a web service to read and write data from the iOS app/client. Even my personal side project apps are moving from completely isolated on the device to talking to a web service.

If you work on any sort of mobile client that communicates with a web service, you should learn how to use Charles Proxy. I’ve been using this tool for years and find it absolutely indispensable.

This post will give a primer on using Charles with a simple iOS project. I wrote a very simple project that will load the Curated Images from Unsplash. You can grab the source code from GitHub.

All of the setup in this post is for the iOS Simulator. But setting up Charles to talk to other devices (tvOS or real iOS/tvOS devices), is easy enough. I have written a separate guide to setting up Charles Proxy for an Apple TV device, which you can find it here: Setting up Charles Proxy on Apple TV (tvOS).

Please Note: The way I’ve outlined the instructions here is not the only way to do things. Feel free to explore the app on your own.

Also Please Note: I’ve included short YouTube videos showing the steps for the instructions below. Some of the instruction sets can be complicated and the YouTube videos should help out.

Charles Proxy Details

Before we get started, here are some details about Charles Proxy. Directly from the developer’s website:

Charles is an HTTP proxy / HTTP monitor / Reverse Proxy that enables a developer to view all of the HTTP and SSL / HTTPS traffic between their machine and the Internet. This includes requests, responses and the HTTP headers (which contain the cookies and caching information).

Website: http://www.charlesproxy.com

Cost: $50 USD

Free trial? Yes, for 30 days

Charles Proxy Overview

Charles Proxy is an HTTP proxy/monitor application. It allows you to monitor web traffic from a variety of sources, including macOS/iOS/tvOS devices and the iOS/tvOS simulator. This means that you won’t have to write temporary code like this:

print("JSON Response: \(JSON)")

or

NSLog(@"JSON Response: %@", JSON)

Instead, you’ll be able to setup your device/simulator to use Charles Proxy and watch the inbound/outbound HTTP(S) traffic without making a single code change.

Setting up Charles

The steps for configuring Charles to watch iOS Simulator traffic have gotten so much easier over the years. Follow these steps to get started:

  1. Launch Charles Proxy
  2. Make sure that you have run the target iOS Simulator at least once.
  3. Quit the iOS Simulator
  4. Open Charles and navigate to Help -> SSL Proxying -> Install Charles Root Certificate in iOS Simulators

If your app is talking to a HTTPS website (as it should be), there may be a few extra steps you need to do in order to actually see the data. By default, the HTTPS/SSL response from a web service may look like this:
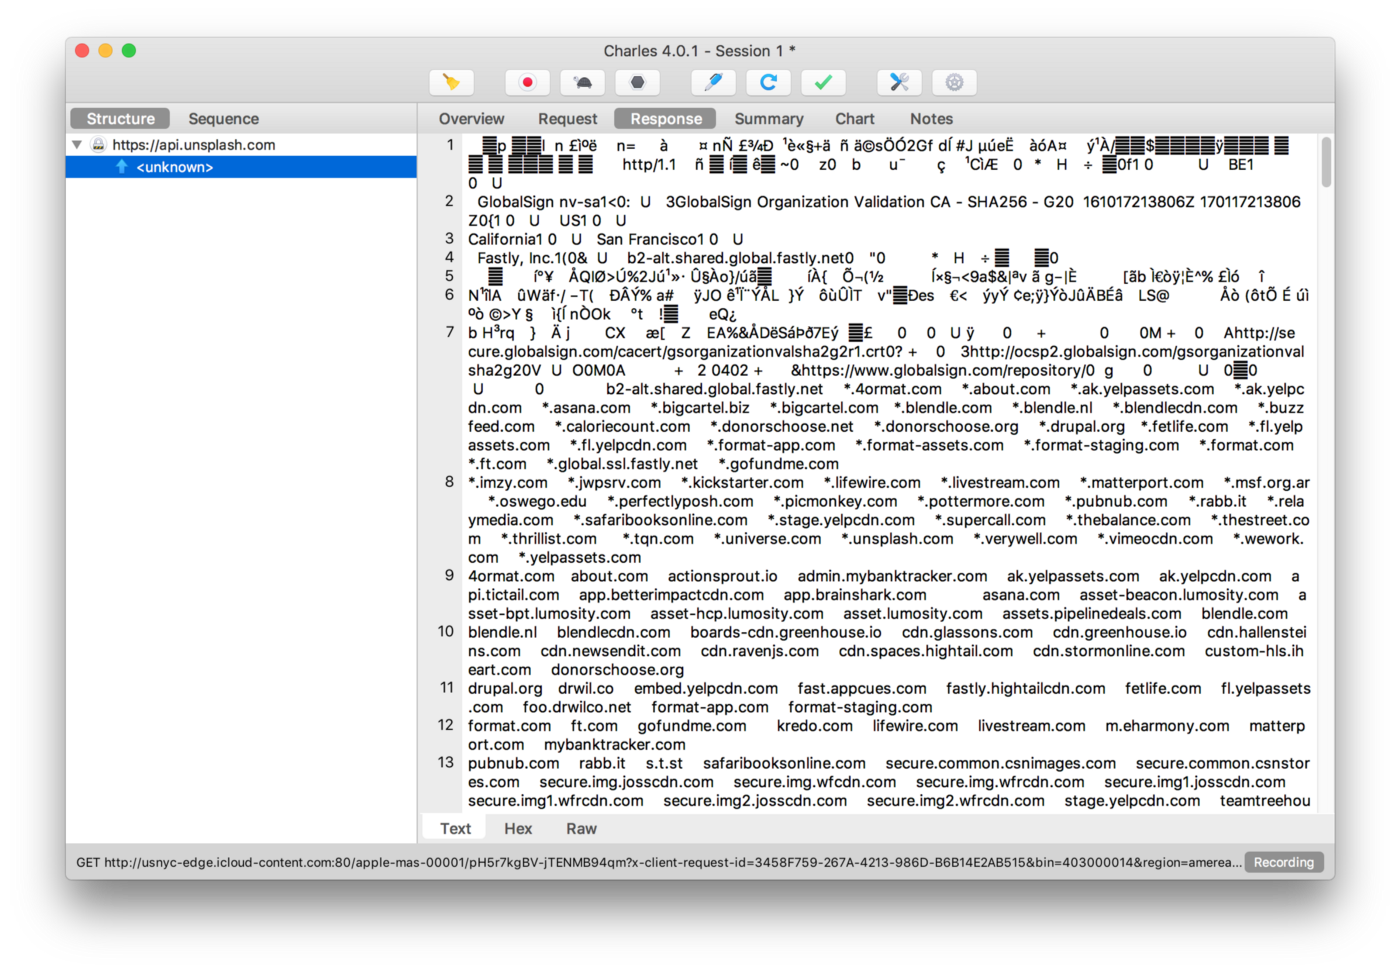
Charles Traffic without SSL Proxying

In order to unscramble that mess, you need to enable SSL Proxying for the domain. Follow these steps to enable SSL Proxying for the Unsplash API domain:

  1. Open Charles and navigate to Proxy -> SSL Proxying Settings
  2. Click on the SSL Proxying tab.
  3. Make sure Enable SSL Proxying is enabled.
  4. Click the Add button at the bottom.
  5. Enter api.unsplash.com into the Host field and click OK.

Thats it. When you restart your app, Charles should start capturing your web traffic. The HTTP response will look more like this:
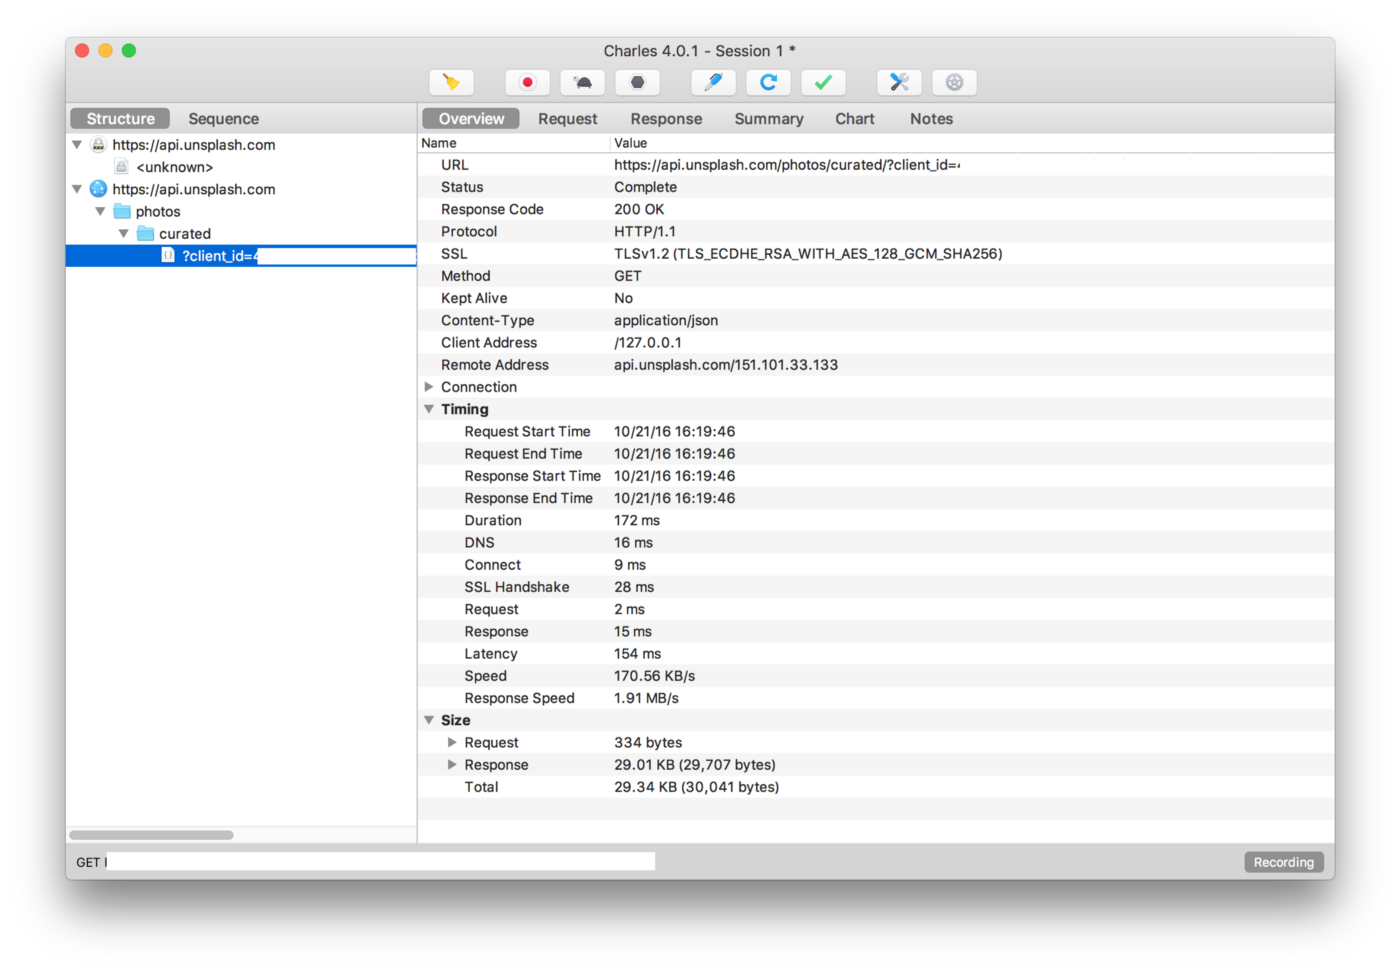
Charles Traffic with SSL Proxying

If you’d like to know how to install the SSL Certificates for other devices, the Charles website has instructions on how to do this.

You can use Charles as it is, or you can customize things. I don’t like having all of my web traffic recorded, so I limit what Charles records on my behalf. In order to do this, follow these steps:

  1. Open Charles and navigate to Proxy -> Recording Settings
  2. Click on the Include Tab tab.
  3. Click the Add button at the bottom.
  4. Paste http://api.unsplash.com/* into the Host field and press the Tab key on your keyboard. All off the fields will be populated here.
  5. Click OK.

Once you start adding entries here, Charles will not record traffic to other domains. This really helps in keeping your traffic logs nice and clean. It really helps when you submit defects/tickets to other people (say the web service team) with a nice clean Charles log showing what happened.

Watching Traffic

If you’ve made it this far, you’ve already seen the first major feature of Charles. You can view web traffic. This feature alone is worth purchasing a Charles license. Being able to see live data from a web service during development, testing and (even the) production phases is invaluable.

During the development phase, it’s great to see the data you are getting back in your app. Sure, you can add some debug print lines (shown above), but recompiling an app just to add logging statements you’ll need to remove later can be a pain.

Not only can you view traffic, but you can save the Charles session (File -> Save Session) for later inspection. In my day job, we have often asked QA for Charles logs along with defects that are created. This helps us know if the API (web service) is returning bad data or if the app is showing the wrong thing.

This technique of watching traffic and saving it later works for production issues too. If a single user (that you have physical access to) is having an issue, you can (temporarily) install the Charles SSL Cert and watch their traffic through Charles. This particular user may have something odd in their setup or account that’s causing something funky going on.

Please Note: This last technique where you view a customer’s data should be used sparingly. We never used it with external, paying customers. We always used this technique with internal customers. You should have the user’s permission before doing so. Having access to your customers’ logs can mean you may have access to their login information. We always have a user log into the system before we start tracking their logs. Just be careful here.

Mapping

Ok. So, I can watch traffic with Charles. What else does the app do?

One of the major benefits of using Charles is to map responses somewhere else. You can map responses to either a local file, or to a remote server. In this blog post, we’ll demonstrate mapping an API call in my Unsplashed demo app to a remote service that always returns a 500 HTTP Status code.

Using this technique is perfect for testing failures from a remote API that your app depends on without changing code to simulate the error or actually taking down the service. You can test this on an app build that is ready to ship without having to make changes. The thought of taking down a service so you can test error conditions is terrible. Don’t do that.

Remote mapping to 500 service

Great. You’re on board and want to try out this mapping thing. In the GitHub repo, there is a directory called “Charles Rules” that contains the first rule we’ll be importing into Charles. You don’t need to import this rule, you can create it yourself, but I’ve added it for simplicity.

Here’s how you import the existing rule from the GitHub Repo:

  1. Open Charles and navigate to Tools -> Map Remote…
  2. Click on the Enable Map Remote checkbox to enable it.
  3. Click the Import button at the bottom.
  4. Navigate to the Charles Rules/500HttpStatusRemote.xml file and click Open.
  5. Click OK.

Or if you’d rather create the rule yourself, follow these steps:

  1. Open Charles and navigate to Tools -> Map Remote…
  2. Click on the Enable Map Remote checkbox to enable it.
  3. Click the Add button near the bottom.
  4. Paste https://api.unsplashed.com/photos/curated/?client_id=* into the Map From Host field and press the Tab key on your keyboard. All of the fields will be populated here.
  5. Paste http://httpstat.us/500 into the Map To Host field and press the Tab key on your keyboard. All off the fields will be populated here.
  6. Click OK.
  7. Click OK.

Now, if you relaunch the app, you should be presented with an error message and see that there is now traffic being routed to http://httpstat.us/500.

The service http://httpstat.us can serve up all of the HTTP status codes including 418 I'm a teapot. You can use this technique to test all sorts of error conditions. The sample project responds the same way based on any non-200 OK response, but your app may need to respond differently based on various HTTP status codes.

When you look at the Charles traffic, you will no longer see the original URL being mapped. This also means that you’ll need to listen for the mapped URL in addition to the original one. Please read above for notes on adding additional URLs.
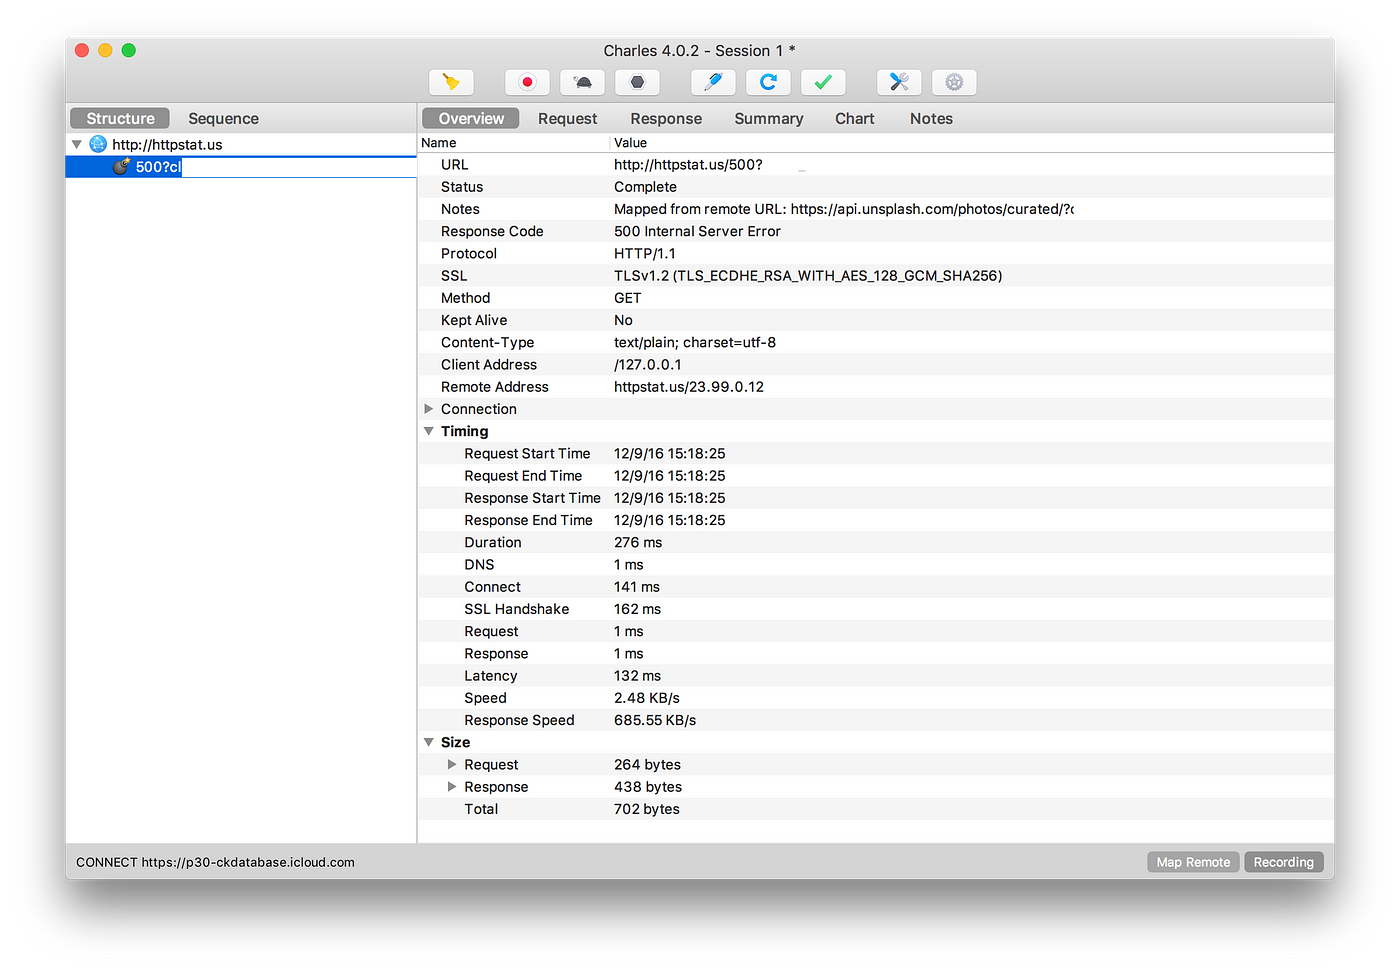
500 Response Using Charles Mapping

If you look at the response overview, you’ll notice that Charles has included a note about the response:

Mapped from remote URL: https://api.unsplash.com/photos/curated/?…

This note is important so that you know what’s happening with your messages. It’s also helpful for debugging in the next section.

Rewriting Traffic

Mapping traffic can be a really powerful tool. But Charles can do more. You can also rewrite responses from an API. Why would you want to do this? I can think of two very specific examples:

First, it’s useful when you want to return a known response on every call. This could be useful for testing with an empty result set, or testing with a funky response. Either way, you can always rewrite the response so that it includes exactly the data you’re looking for.

Second, you can handle APIs that do a bad job of error handling. I’ve worked with a few APIs that would return a 200 OK response for an error, but include JSON or XML that would include an error message. I know, we all make mistakes. Services like http://httpstat.us can’t handle this. Rewriting traffic will allow you handle any case you need to.

Rewriting

I’ve included a few example rewrite rules in the Charles Rules folder in the GitHub repo. You can import these using the following steps.

  1. Open Charles and navigate to Tools -> Rewrite…
  2. Click on the Enable Rewrite checkbox to enable it.
  3. Click the Import button at the bottom.
  4. Navigate to the Charles Rules/422RewriteError.xml file and click Open.

Creating a rewrite rule from scratch is not always easy. They can be tricky to setup and it’s easy to forget steps.

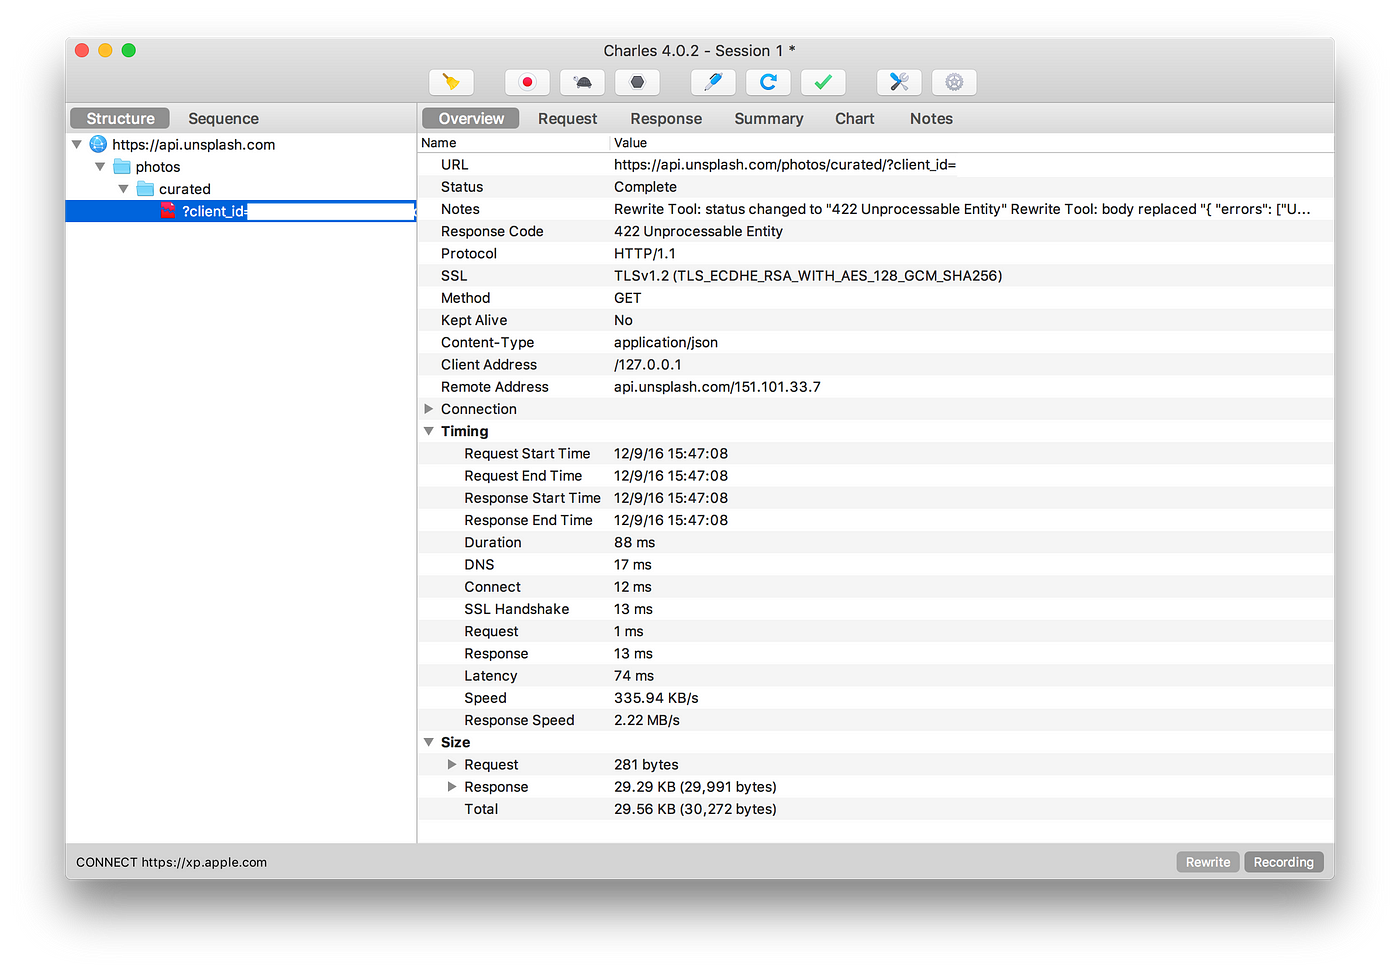
This example will return a HTTP status code of 422 (Unprocessable Entity)along with an array of error messages. This is taken directly from the Unsplash API Error Messages docs. If I were to take this example app further, I would add code to handle these error responses.

There are a lot of steps here. Please bear with me. Or watch the video below.

  1. Open Charles and navigate to Tools -> Map Remote…
  2. Click on the Enable Rewrite checkbox to enable it.
  3. Click the Add button near the bottom.
  4. Type a name into the Name field.
  5. Click the Add button under the Location section
  6. Paste https://api.unsplash.com/photos/curated/?client_id=* into the Host field and press the Tab key on your keyboard. All off the fields will be populated here.
  7. Click OK
  8. Click the Add button under the bottom Type/Rules section
  9. Change the Type dropdown value to Body
  10. Click the Request checkbox to that it is disabled
  11. Click the Response checkbox to that it is enabled
  12. Paste { "errors": ["Username is missing", "Password cannot be blank"] }into the Value field in the Replace section at the bottom.
  13. Click OK
  14. Click the Add button under the bottom Type/Rules section
  15. Change the Type dropdown value to Response Status
  16. Paste 422 Unprocessable Entity into the Value field in the Replace section at the bottom.
  17. Click OK
  18. Click Apply
  19. Click OK
422 Response Using Charles Rewrite

When creating these rewrite rules, it’s valuable to make sure the responses are either valid XML or JSON before using them. It can be painful to edit parts of responses in the Charles rewrite modal view. I’ll usually verify that the JSON is valid before pasting it in there. In the past, I’ve spent a lot of time trying to debug my rules only to find out the response JSON is invalid.

Conclusion

I hope this primer has been useful on getting started with Charles Proxy as a development tool. There are many more features to Charles Proxy that I haven’t even touched on.

Charles Proxy is invaluable to me as a client developer. There are too many features to cover in this article. In fact, I’m still discovering new features that I hope to use in the future.

As I continue to grow and learn more, I may cover new topics in a subsequent post, if there’s enough interest.

Setting up Charles Proxy on Apple TV (tvOS)

Update : This post is a little out of date. WillowTree has posted the most up to date version of this. Please check it out: https://willowtreeapps.com/ideas/a-how-to-guide-for-apply-tv-setup-with-charles-proxy.

I use Charles Proxy as one of my development tools. I have done so for years. It’s invaluable to me. If you do any sort of client development that calls any sort of web service, you should look into Charles Proxy too.

This blog post is mostly taken from this excellent post on WillowTree development blog post called: 12 Steps For Setting Up Charles Proxy With tvOS. I recently tried to follow their steps, but was unable to get the SSL cert I needed from the the URL outlined (www.charlesproxy.com/getssl). You can now get the SSL cert directly from the Charles Proxy app. This post includes most of their steps, but have an updated step for getting the SSL cert. They deserve all of the credit here for the original post.

Set up a profile

In order to set up tvOS, you need to use a profile to setup a proxy.

  1. Download and install Apple Configurator.
  2. Open Apple Configurator and navigate to File -> New Profile.
  3. Give your profile a name and a unique identifier. Typically you’ll be setting it up to go through the same PC you’re using, so indicating this is encouraged (e.g. Charles-JoeLaptop).
  4. Select Global HTTP Proxy* on the left and click configure.
  5. Input your IP address of the machine running Charles and 8888 (default) for the port.*
  6. If you need SSL, you need to add the Charles SSL cert. (if you’re not tracking SSL you can ignore this part):
  • Open Charles and navigate to Help -> _SSL Proxying -> Save Charles Root Certificate.
  • This will save a *.pem file containing the certificate you need. You need the certificate in a different format to add to your profile. (There are different ways you can do this, I found the simplest way was to add it to my keychain then export it as a *.cer file.)
  • Back in Configurator, select Certificates on the left and click Configure.
  • This brings up a dialog to select the relevant certificate, select the one described above and click Open.
  • It may say, “This root certificate is not trusted.” This just reflects the status of the user you’re using on the Mac.
  • Save and close the Profile.

Prepare Apple TV in Configurator

In order to be able to install profiles onto your Apple TV, the device needs to be prepared and supervised.

  1. With the Apple TV turned on, connect it to your Macbook using the USB-C adapter.
  2. Open Apple Configurator.
  3. The Apple TV should show up under All Devices.
  4. Select the device and click on the Prepare button at the top of the window.
  5. Follow the On Screen prompts. At the “Enroll in MDM Server” prompt, I selected “Do not enroll in MDM”. I selected the defaults for everything else.

Install the profile

  1. Now you will need to load the Profile onto the Apple TV. This requires a USB-C adapter.
  2. With the Apple TV turned on, connect it to your Macbook using the USB-C adapter.
  3. Open up Apple Configurator.
  4. The Apple TV should show up under All Devices.
  5. Select the device and click on the Add button at the top of the window.
  6. Select Profiles and find the profile you created above, then click Add Profiles.

You should start to see web traffic in Charles Proxy from your Apple TV.

I’ve got another blog post about Charles Proxy and using it in a development/QA process. I hope to have that post out shortly, it’s still a work in progress.

Swift Labeled Statements

I’ll be honest. I didn’t know that Labeled Statements were a thing (let alone in Swift) until a few days ago. I discovered them while reading Pro Swift by Paul Hudson for the Philly CocoaHeads Book Club.

Labeled statements allow developers to label control statements. Here’s what a for loop would look like with a label:

fancyLabel: for each in array {    
    ...
}
Labeled for each loop

An if statement with a label looks very similar.

anotherLabel: if known == test {    
    ...
}
Labeled if statement

Lastly, a switch statement looks like this:

switchLabel: switch(myEnum) {    
    ...
}
Labeled switch statement

As you can see the syntax for a label is label followed by a colon (:) and then the statement as normal.

Ok. So, what can I do with this?

These can be thought of as glorified goto statements. You can use continue or break statements to change the control flow to a labeled statement or break out of a labeled statement.

This can be handy for breaking out of nested loops. Typically, breaking from a nested loop will only break out of the nested loop. Control will remain in any outer loops. By adding a label to the outer loop, you can effectively goto or break from that outer loop.

Here are two examples.

A nested for loop using continue:

fancyLabel: for each in array {    
    for eachSubItem in subArray {        
        switch statement {        
        case one:            
            continue fancyLabel        
        ...        
        }    
    }    
    ...
}
Nested labeled for loops with continue

Here’s an example of break being called in a nested for loop:

 fancyLabel: for each in array {    
    for eachSubItem in subArray {        
        if statement {            
            break fancyLabel        
        }        
        ...    
    }    
    ...
}
Nested labeled for loops with break

If you have a complex method that contains nested for loops, a labeled statement will allow you to break from an outer loop and continue on with execution of the method.

Paul had some nice examples in the book. I’m not going to re-publish those here. Instead, I’ve come up with my own poor/contrived example here:

func findNeedle() -> Coordinates {
    var x: Int = 0, y:Int = 0

    searchHaystack: for row in haystack {
        for each in row {
            if each == needle {
                break searchHaystack
            }

            y += 1
        }
        
        x += 1
        y = 0
    }
    
    doStuffWithResults()

    return (x, y)
}
Example function with labeled statements

This example will loop through a associated array looking for a value. When it finds the ‘needle’, it will exit out of the nested for loops and continue on with the method.

This is a really simple example on how to use labeled statements. I’ve tried to think of a better example, but nothing really felt good. I feel like the examples I come up with could be written better without the labeled statement at all.

I don’t think these will be entirely useful in practice. In essence they are glorified goto statements and using them feels like a bad code smell to me. If you need to use them, you can probably refactor your code to avoid them. But it’s nice to know that they exist.

Side Projects

I’m a huge fan of having side projects. I tend to have a handful in some sort of development at any given time. I find that side projects help me alleviate some of the boredom that can come along with a normal job. Instead of just boring old fixing defects for weeks on end, I get an opportunity to flex my muscles a bit. Side projects also give me an opportunity to learn new technologies and skills.

Working on side projects has been a bit tougher lately with life commitments.

Here are a few examples of side projects I’ve worked on.

DS_Store Cleaner

DS_Store Cleaner was my first notable side project. I started this project a long time ago when I was a Java developer. It was earlier in my career. I was working with files on Mac OS X, Windows and Linux. Mac OS X creates and maintains (hidden) files call .DS_Store files, which are both annoying to deal with and — at one point in time — were a security risk.

The app was originally a small Java app. When I decided to distribute it, I used a tool, possibly just an Ant task, to create a Mac OS X wrapper for my Java app. Looking back, it was terrible. The original Java/hybrid binary I shipped stopped working right around 2010/2011.

This version of the app was actually mentioned in some old Mac magazines. I may even have a few of the issues laying around somewhere.

Fast forward to 2010/2011. I saw some reports that my app no longer worked with the latest version of Mac OS X. By that time, I had transitioned into a role of a full-time iOS developer and decided to rewrite the app natively and submit to the AppStore.

I did exactly that. I rewrote the app in Obj-C and submitted it to Apple. They rejected the app. I don’t think that they liked me deleting these files that the Finder created. I submitted an appeal. I even found another app in the store that does almost the same thing. Apple called me to discuss the appeal, and let me know that they would never approve the app. I gave up and released the app via my website.

The app has done moderately well. It’s always been free, so I’ve never seen a penny from it. But it was a great learning experience. I’ve thought about providing an update to the app, but it just hasn’t been been a priority yet.

Voice360

Voice360 started as a web project. I had been into the Xbox 360 at the time and tracking achievements. I found this nifty site called 360Voice which would track your Xbox 360 game data and generate a daily blog entry for. The blog entry often included any games you may have played the day before and how many achievements you may have earned.

The creators of the site offered an API that developers could use. Around the same time all of this happened, the original iPhone was released. Originally, the iPhone didn’t allow for native apps. So, I decided to write a web app for the iPhone. I didn’t have an iPhone at the time, but I did have an iPod Touch. So, I developed a mobile-friendly site.

Fast-forward a few years. I got it in my mind to develop a native iOS app. So, I did just that. Not only did I develop a native iOS app, I also developed an Android and Windows Phone 8 app. What was I thinking? They didn’t do well at all. I think I sold exactly 1 copy on Windows Phone 8.

Voice360 has been retired. The service isn’t even available anymore. I killed the app before the service was shut down.

MyCntdwn

MyCntdwn was my most successful side project. In fact this side project changed my career path.

This idea started when the iOS SDK was announced. I was looking for something to do with it. My brother suggested a countdown app. It sounded easy enough, so I got right to it. The App Store launched in July of 2008. I had MyCntdwn in the store in October of the same year.

This app led to other side projects and paying side gigs. It also eventually led to me changing from a full-time Java/J2EE developer to an iOS Developer in Fall of 2010.

I created iPad (only) and Android versions of the app. I’ve since pulled both of these from the stores. I wasn’t supporting them. And the iPad app will be supported with a new (Universal) version of MyCntdwn.

I’m still working on MyCntdwn. I swear. I really am. I’ve just been in a bit of a rut lately. The last update to the store was in Fall of 2013. Believe me, I’ve been working on it. I’m currently on my 4th or 5th attempt at version 4.0. This one’s gonna ship, I can feel it. I think I’m still another month or two away from it shipping. I was 75% done with the previous incarnation when my wife saw it, said she hated the new look and I scrapped the entire version. I wasn’t thrilled with the version and her not liking it “gave me permission” to just scrap it.

Showers

Showers was a project that I thought of and wrote 90% of it in a weekend. I had the idea for an app that would include rain sounds, plus variable thunder sounds.

Showers was by no means a financial success. I never thought it would really be one. It was an experimental app for me. I got to learn quite a bit more about AVPlayer, weighted random numbers, Apple Watch and more.

This project was also initially rejected by Apple. The original UI was much simpler. The reviewer I got didn’t like that it was so simplistic. I added the settings/about screen and that seemed to make the review board happy.

I’ve made a few dollars from Showers. Last Summer, I decided to make the app free for everyone. It’s still got a handful of users. I think I’ll make an update to the app and fix a few of the crashing issues. I will probably end up removing the Apple Watch support. I never use the watch app, I don’t know if anyone else does. I may as well remove it.

Beer Styles Guidelines

I’ve been a homebrewer for the past few years. It’s been a fun hobby. As part of that hobby, I’ve been trying to learn more about the various beer styles. Drinking new beer styles and examples is most of the fun. Beer Style Guidelines: BJCP 2015 fits perfectly into that hobby.

There is a certification you can get for judging in homebrew competitions. It’s called the Beer Judge Certification Program (BJCP). For this program, you learn more about the various beer styles including origin, tasting notes and even commercial examples.

There are currently a few BJCP apps on the store. BJCP 2015 and Beer Styles — BJCP 2015 & 2008 Style Guidelines for beer, cider & mead were both available on the store when I built and released the app. Both are very good apps. I thought I could do better though. I think I’ve added some nice features to the app idea.

This one didn’t make any money, but I learned quite a bit while working on it. Not only things about iOS and Swift, but about homebrew and beer. I thought about making the app ad supported, but removed any ads at the last minute.

For this project, I also did all of the “artwork.” For better or worse, it’s all my own creation. In the past I have relied on my brother to help me out with that. With this project, I decided that I wanted to give it a shot myself.

I fully intend to release an update to the app. I’ve gotten the OK to include other beer style guides and intend on including them in an update. I just haven’t had the time that I need to do this properly. For such a small app, there’s quite a bit of work involved getting the beer styles in place in the correct format.

More To Come

There’s a common thread throughout all of these side projects. I’ve learned quite a bit from them. They also give me a break from my day job. I’ve got a handful of side projects in the pipeline. None are ready for real users yet (and may never be).

I really like working on more experimental apps. I plan on doing more. If they are successful, I can continue to mature the apps. If they are failures, I often try to support them for a year or so and then move on to something new and exciting.

Side projects have always given me an opportunity to learn new and exciting things. While they may not all succeed, they have been great learning opportunities. A side project being successful or not shouldn’t diswade you from trying. I believe everyone should work on a side project or two. You never know, that experimental side project you’ve been working on may change your career.

Fibonacci Sequence

I wrote my first post covering the Fibonacci Sequence two years ago in April 2014. The original post was written with Objective-C sample code and only considered one possible solution. A few months later, to my surprise, Apple had a session at WWDC called Advanced Swift which covered some of the approaches used below. I thought this would be a great time to provide an update to the original post but with a bit more detail.

The Fibonacci sequence is a special sequence of numbers. The first two numbers are 0 and 1. The numbers in the sequence after that build on these first two numbers. The pattern is the next number in the sequence is the sum of the two previous numbers.

The Fibonacci sequence begins like this: 0, 1, 1, 2, 3, 5, 8, 13, 21, 34, 55, 89, 144, etc…

A few years ago I was interviewing at multiple companies. One interviewer asked me how I would generate a Fibonacci number at a given index.

For example: Given 0: return 0; Given 1: return 1; Given 2: return 1; … Given 20: return 6765.

I started by writing a method that would solve the problem through brute force using recursion, but it wasn’t really what the interviewer was looking for. I fumbled through the question and didn’t get an offer from that company.

Recursion

Let’s take a look at what I was trying to do during this interview.

The code would look something like this in Swift:

Recursive Fibonacci

Look at how many times that method is called for a relatively small index (20). 21,891 times! That’s not really a good way to do it.

I then took it one step further. I had it calculate the first 29 Fibonacci numbers. This process resulted in the recursive method being called 2,692,507 times, which took about 8 minutes (in Xcode Playgrounds). That’s just not scalable. Let’s try another approach.

Memoization

During the interview, I had thought that we could cache some of the results. This would allow us to access Fibonacci numbers that had been generated much faster. I wasn’t aware at the time that this technique is called memoization.

This technique will help optimize the calls once a result has been generated. Since this is a recursive approach which depends on previous calculations, this approach is much more efficient. Let’s look.

I tweaked the code in our recursion example to include memoization. You can see that the code isn’t that much more complex. The caching was easy enough to add. The bonus here is that if we call fibanocciaAtIndex for a given index more than once, the answer is immediately returned.

Memoized Fibonacci First Run

This time when I calculated the same relatively small index (20), the call count is much smaller, only 21 times.

Memoized Fibonacci Second Run

I then had it calculate the first 29 Fibonacci numbers. The results were calculated much faster and with fewer calls. This is a huge improvement over the pure recursive appraoch.

Golden Ratio — Binet’s Fibonacci Number Formula

Is there another approach? One where you don’t need recursion? Of course there is. I didn’t figure out this approach until well after that interview, which prompted the original blog post.

I did more research into the Fibonacci Sequence and discovered that you can calculate these numbers using the Golden ratio.

The Golden ratio is defined mathematically as:

Golden Ratio

Or φ ≅ 1.618034…

It turns out you can use the Golden ratio to calculate numbers in the Fibonacci sequence. This is Binet’s Fibonacci number formula:

Binet’s Fibonacci Number Formula

This is a much cleaner approach to the original recursive approach above. Instead of dealing with recursion, which can be tricky, this is a straightforward method to calculating Fibonacci numbers.

Here’s what that looks like in code:

Binet's Fibonacci Number Formula Code

Large Numbers

In my original post, I had some thoughts about how to handle larger numbers. Unfortunately, I never made any progress there. I think once I posted the original blog post, I lost interest in dealing with really large numbers. There are a few interesting projects like OSXGMP and BigInteger that may work here. I’m including them for reference, in case you’re interested in larger numbers.

Conclusion

There are probably other ways to figure out a Fibonacci number at a given index. I’ve gone through three methods above. I wouldn’t recommend the first approach. Recursion with memoization is probably the cleanest of the approaches and doesn’t require a lot of math.

Just for fun, I’ve put these code samples up of GitHub. The project includes both Swift examples (in Xcode Playgrounds) and Objective-C examples (written using CodeRunner 2). Feel free to get them and play with them.

GitHub Repo: rwgrier/fibonacci-sequence

Thanks to Keith Elliott

OlderNewer